在MySQL 5.7中,按照如下语法可以创建三种索引:btree、fulltext、spatial。
CREATE [UNIQUE | FULLTEXT | SPATIAL] INDEX index_name
    [index_type]
    ON tbl_name (key_part,...)
    [index_option]
    [algorithm_option | lock_option] ...
但是根据存储引擎的不同,有所区别;如下表:
| Storage Engine | Permissible Index Types |
|---|---|
InnoDB | BTREE |
MyISAM | BTREE |
MEMORY/HEAP | HASH, BTREE |
NDB | HASH, BTREE (see note in text) |
InnoDB中只支持Btree一种索引类型(index_type字段只有一种选择),InnoDB不支持Hash。另外,当你创建的是fulltext和spatial索引时,index_type就不能指定了(这两种索引有自己的存储格式,fulltext的实现一般是倒排表,也根据存储引擎有关;spatial一般是R-tree;)
这里CREATE INDEX指的是二级索引,那么二级索引在5.7具体是怎么创建的?本文对整个问题进行了详细的剖析。
MySQL创建二级索引的过程中,如果失败了只能重做。这期间的变更不会写redo日志记录。
https://dev.mysql.com/doc/refman/5.7/en/innodb-online-ddl-operations.html
If the server exits while creating a secondary index, upon recovery, MySQL drops any partially created indexes. You must re-run the
ALTER TABLEorCREATE INDEXstatement.
Online Create Index
在MySQL版本<5.5,创建一个索引相当于重建一个表(CopyTable)。当版本>=5.5时,加入了FastIndexCreate特性,但只对二级索引有效(Inplace);索引中只有发起createindex时刻的数据,create index时只能读不能写。过程有主要有如下三步:
- 扫描表,建立内存buffer和临时文件
- 进行合并排序
- 将行插入到索引中
在版本>=5.6.7时,加入了Online Create Index的特性,创建二级索引的时候可读可写(还是会短暂block一下,但是已经影响很小了)。本文针对Online Create Index进行详细阐述。
对于MySQL来说,创建二级索引属于一种alter table操作,涉及到磁盘文件和内存缓存的修改。
磁盘文件:
- InnoDB的ibd,MySQL的frm;
- InnoDB的系统表空间的系统表;
内存缓存:
- SQL层的table definition cache (frm的缓存)
- InnoDB层的dictionary cache(系统表的缓存)
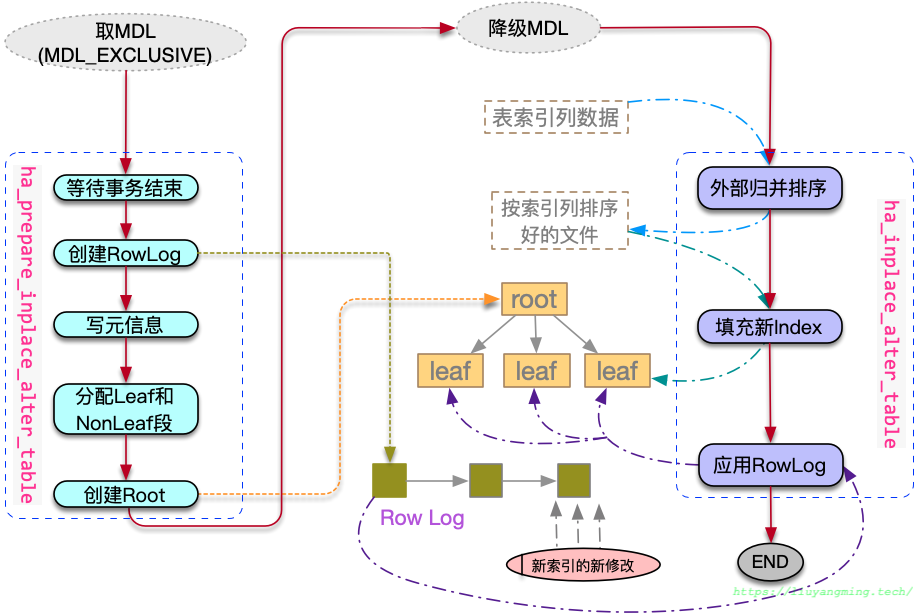
入口函数是mysql_alter_table,大致的过程如图所示:
在该函数中,首先通过调用create_table_impl,创建一个临时的frm文件。
然后通过ha_innobase::check_if_supported_inplace_alter检查该表对应的存储引擎是否支持inplace的alter table(create index 属于alter table的一种);InnoDB返回HA_ALTER_INPLACE_NO_LOCK_AFTER_PREPARE,表示支持在prepare阶段之后不加锁。
然后进入了mysql_inplace_alter_table。分为以下几步:
mdl_context.upgrade_shared_lock;根据InnoDB的返回信息,将MDL的共享锁升级为互斥的。tdc_remove_table(TDC_RT_REMOVE_NOT_OWN_KEEP_SHARE):清理该表的TABLE_SHARE对应的TABLE,但是并不置旧TABLE_SHARE。lock_tables:加表级锁。ha_innobase::prepare_inplace_alter_table;准备系统结构:插入SYS_INDEXES,并建立btree根节点;分配RowLog(dict_index_t->online_log)空间;获取一个read view,后期基于该read view读取数据。downgrade_lock:根据InnoDB的返回信息,将互斥锁降级为MDL_SHARED_UPGRADABLE。ha_innobase::inplace_alter_table;构建索引数据:遍历一级索引,对索引列进行归并排序;将排序好的数据,填充到索引中,这期间的数据暂存在Rowlog;构建索引数据过程中,页的修改不写redolog,期间通过FlushObserver来进行脏页刷盘;最后应用RowLog,然后写一条MLOG_INDEX_LOAD。写MLOG_INDEX_LOAD这条日志主要用在backup中,如果backup的过程中进行了不写redolog的DDL,那么这个backup数据可能就有问题,因此在恢复的时候就可以通过读取redolog得知了。
wait_while_table_is_used(HA_EXTRA_PREPARE_FOR_RENAME):再次给表的MDL加X锁,然后清理并刷新该表的TABLE_SHARE。ha_innobase::commit_inplace_alter_table:设置data dictionary中关于这个index的标记,并标记为commited。最后提交事务,释放锁资源。mysql_rename_table:将临时的frm重命名回去;
可在系统表performance_schema.metadata_locks中观察MDL的状态。
总结来说,上述步骤除了在sql层的操作外,在InnoDB层,这里主要有三步:
- Prepare Index Meta
- Append Index Data
- Commit Index Meta
下面针对这三步详细介绍一下:
1. Prepare Index Meta
ha_prepare_inplace_alter_table
添加系统元信息
row_merge_create_index_graph:在系统表空间中,插入关于该索引的元信息(ibdata1)。
在dict0crea.h的dict_create_index_step中,定义了初始化index的4步操作:
INDEX_BUILD_INDEX_DEF:dict_build_index_def_step;
构造一个索引的定义元组(后续将插入到系统表
INFORMATION_SCHEMA.INNODB_SYS_INDEXES中,具体内容在dict_create_sys_indexes_tuple函数中)。INDEX_ID: 40 NAME: i1 TABLE_ID: 34 TYPE: 0 N_FIELDS: 1 PAGE_NO: FIL_NULL SPACE: 23 MERGE_THRESHOLD: 50
注意 此时,page_no还未确定,先设置为FIL_NULL。
INDEX_BUILD_FIELD_DEF:dict_build_field_def_step;
基于要创建的索引,构造一个系统表:
INFORMATION_SCHEMA.INNODB_SYS_FIELDS的元组。取决于索引列有几个,该步骤执行多少次。INDEX_ID: 117 NAME: col1 POS: 0这里系统表的插入模式是INS_DIRECT,
/* Insert node types */ #define INS_SEARCHED 0 /* INSERT INTO ... SELECT ... */ #define INS_VALUES 1 /* INSERT INTO ... VALUES ... */ #define INS_DIRECT 2 /* this is for internal use in dict0crea: insert the row directly */INDEX_ADD_TO_CACHE:dict_index_add_to_cache_w_vcol;
将第一步中的索引信息,添加到dictionary cache中,注意这里的page_no还是FIL_NULL。
INDEX_CREATE_INDEX_TREE:dict_create_index_tree_step;
在ibd文件中创建索引。
- 检查表空间与文件是否存在
- 初始化btree的cursor
- 创建root节点:btr_create
- 更新系统表sys_indexes的page_no字段,(此时才更新page_no)
创建Btree根节点
btr_create
先不考虑type&DICT_IBUF==True的情况:
fseg_create
创建两个segment段
- 分配一个Non-leaf段(PAGE_BTR_SEG_TOP ),段首部放在本段的page中。
- 分配一个leaf段(PAGE_BTR_SEG_LEAF ),段首部放在非叶子节点的段中。
page_create:在non-leaf段中,分配一个page;
初始化跟节点信息:level/indexid/next/prev等。
如果type为IBUF_TREE,那么在单独空间中,额外申请一个ibuf的segment。并且只有在fsp_header_init(段空间初始化)且spaceid=0的时候才会将设置IBUF_TREE。
其他准备
row_log_allocate:,此后开启的新事务的修改放在RowLog中。trx_assign_read_view:获取一个read view,后期基于该read view读取数据。
2. Append Index Data
row_merge_build_indexes:遍历一级索引,对索引列进行归并排序;将排序好的数据,填充到索引中。
flush_observer->flush()row_merge_write_redorow_log_applyflush_observer->flush()
ha_inplace_alter_table->row_merge_build_indexes;加载索引数据时,需要在mergefile上进行外部归并排序,因为要进行多次每个阶段的输出在一个临时文件tmpfile中;在排序之前先申请一个内存缓存区block(mergefilebuffer);
创建mergefile的内存缓冲区block,并初始化;
block = alloc.allocate_large(3 * srv_sort_buf_size, &block_pfx);根据索引类型设置FLushObserver(spatialIndex写redo日志,就不需要这个标记)
,因为批量加载数据,不记redo日志;但在进行应用rowlog之前,需要将脏页刷盘。
- online add index: flush dirty pages right before row_log_apply().
- table rebuild: flush dirty pages before row_log_table_apply().
读取一级索引前的初始化工作
- 初始化mergefile的fileDescriptor:
merge_files[i].fd = -1; - 重置rowbuffer(这是用来确认是不是有重复值):
table->field[i]->set_default();
- 初始化mergefile的fileDescriptor:
读取一级索引,创建分区有序的mergefile:
row_merge_read_clustered_index(见下一节)。外部归并排序:
row_merge_sort填充新索引:
row_merge_insert_index_tuples应用RowLog:
- 清理临时文件,释放表空间
- flushobverser->flush
- 写入一个MLOG_INDEX_LOAD 记录,表示相应index的page不写redo,但是已经刷盘完成。
- row_log_apply
创建分区有序的mergefile
row_merge_read_clustered_index
合并排序之前,进行读取并产生分别拍好序的分片。这里不考虑FTS和spatial索引。
创建并初始化record的内存缓存
merge_buf[i] = row_merge_buf_create(index[i]);
查找一级索引,并创建一个持久化的cursor。
	clust_index = dict_table_get_first_index(old_table);
	btr_pcur_open_at_index_side(
		true, clust_index, BTR_SEARCH_LEAF, &pcur, true, 0, &mtr);
btr_pcur_open_at_index_side第一个参数为true,表示cursor从左侧(排序头)开始。
创建特定的内存堆区域:
- row_heap: 用来创建聚集索引的tuple。
- conv_heap:当需要调用row_merge_buf_redundant_convert,将行模式转变为REDUNDANT。
- mtuple_heap:merge data tuple;在
row_mtuple_create中用来放merge的tuple。
扫描聚集索引
定位cursor
cursor在页内向后迭代
判断是不是页内最后一个record
是的话,判断是否有其他线程在等待该聚集索引的rwlock,有则暂停本线程,之后再重新开始。
				btr_pcur_store_position(&pcur, &mtr);
				mtr_commit(&mtr);
		    ...
				/* Give the waiters a chance to proceed. */
				os_thread_yield();

				btr_pcur_restore_position(
					BTR_SEARCH_LEAF, &pcur, &mtr);
迭代到下一页:btr_page_get_next。
————————————————————————————————————
取出record
读取clusteredIndex的记录
判读数据可见性:如果online createindex,那么通过
row_vers_build_for_consistent_read构建可重复读的readview;否则,只是通过rec_get_deleted_flag判断数据是否标记删除了。因此,在MySQL中二级索引是简介的查询,需要两次index lookup。由于缓存的是值,因此文档中,不建议主键设置过大。
Clustered and Secondary Indexes
If the primary key is long, the secondary indexes use more space, so it is advantageous to have a short primary key.
将index record转换为要插入row:
row_build_w_add_vcol。相对应的有将row,转换为index record:
row_build_index_entry
————————————————————————————————————
写buffer
遍历各个index
将tuple插入到sortbuffer中
row_merge_buf_add;通过这个函数可以看出,二级索引中写的是(二级索引的列,主键的值),而不是主键的物理位置。
buffer满了之后(95324):
- 先排序
row_merge_buf_sort; - 然后将buf写到block中
row_merge_buf_write; - 将block写回磁盘中
row_merge_write。 - 清空buf:
row_merge_buf_empty。
- 先排序
外部归并排序
row_merge_sort
上一节得到merge_file,这里基于这个mergefile进行合并排序。
/** Information about temporary files used in merge sort */
struct merge_file_t {
	int		fd;		/*!< file descriptor */
	ulint		offset;		/*!< file offset (end of file) */
	ib_uint64_t	n_rec;		/*!< number of records in the file */
};
这里mergefile的offset是按照sortbufsize为单位(filebuffer即block,虽然申请了 3*sortbufsize的大小,但是每次写还是一个sortbufsize)。
row_merge_write(
/*============*/
	int		fd,	/*!< in: file descriptor */
	ulint		offset,	/*!< in: offset where to write,
				in number of row_merge_block_t elements */
	const void*	buf)	/*!< in: data */
{
	size_t		buf_len = srv_sort_buf_size;
....
	err = os_file_write_int_fd(
		request,
		"(merge)", fd, buf, ofs, buf_len);
除了mergefile之外,还有一个tmpfile;用在mergefile的合并排序过程中。
————————————————————————————————————
那么mergefile的合并排序的具体过程如下
- 首先找到两个偏移,0、half。
- 按照两个偏移量,对block进行多次merge;每次merge的结果放在tmpfile中,每轮返回的时候进行一个tmpfile与mergefile的置换。
- 多次merge之后,num_runs=1;那么结束merge。
填充新索引
row_merge_insert_index_tuples
重复执行下面的过程,将排序好的数据插入到索引中。
- row_merge_read,从mergefile读取一个block。
- row_merge_read_rec,从block中读取一个record
- row_rec_to_index_entry_low,将record转换为一个logical tuple(dtuple_t)
- BtrBulk::insert,通过BtrBulk工具类,将dtuple插入到新索引中。
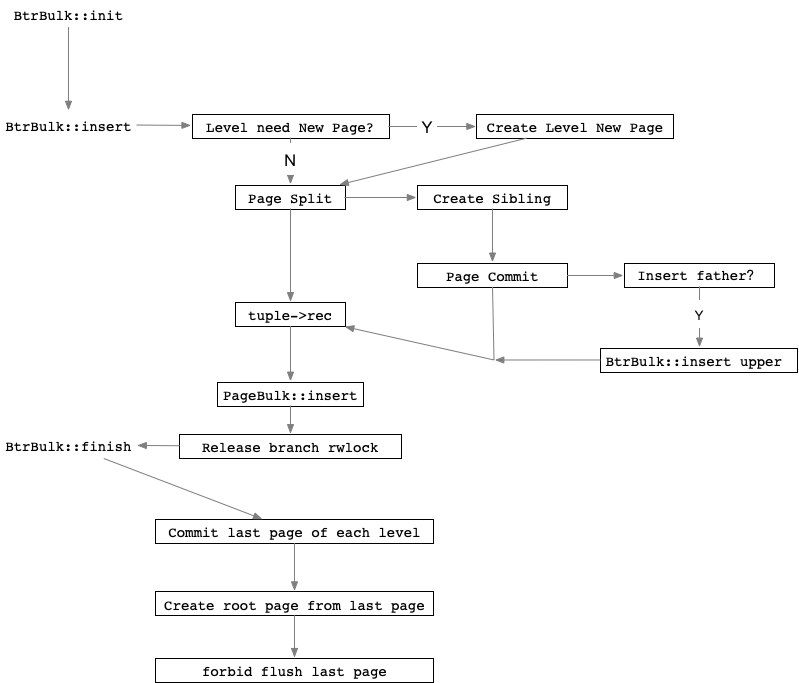
如上流程简图,Btree的批量插入是自底向上的过程;每分裂一个新页,就将之前的页进行pagecommit;然后维护了每个level的最后一个page,在最后BtrBulk::finish的时候将所有level的last page进行commit。
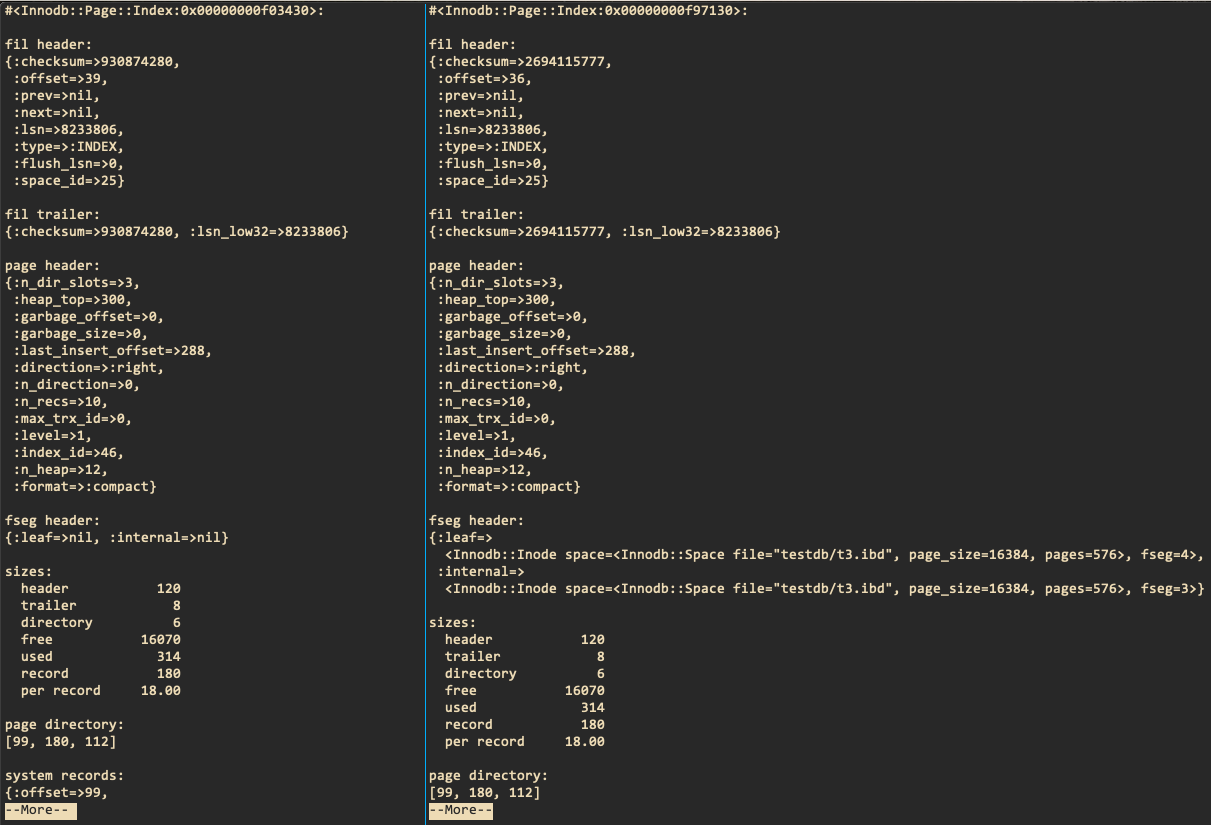
注意,最后一个页的内容其实就是root节点的内容,那么在最后会将last page复制到root page中,那么通过innodb_space可以看到表空间中有一个和rootpage内容相同的page,如下图:
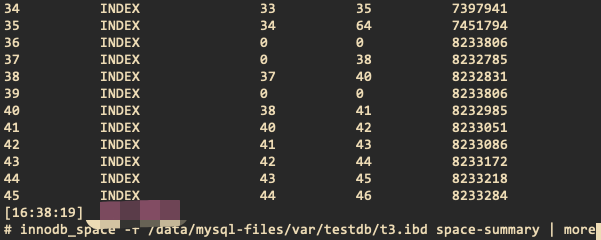
图中的39页就是批量插入的last page,其中数据和root page相同,如下:
应用RowLog
row_log_apply->row_log_apply_ops->row_log_apply_op->row_log_apply_op_low
/** Index record modification operations during online index creation */
enum row_op {
	/** Insert a record */
	ROW_OP_INSERT = 0x61,
	/** Delete a record */
	ROW_OP_DELETE
};
rowlog中的类型有两种,如上:
ROW_OP_DELETE最终对应着btr_cur_optimistic_deleteROW_OP_INSERT最终对应着btr_cur_optimistic_insert
3. Commit Index Meta
- commit_try_norebuild:尝试在data dictionary中提交create index的修改。
- innobase_copy_frm_flags_from_table_share:根据frm的缓存(table_share)更新data dictionary中的信息。
- commit_cache_norebuild:正式在data dictionary中提交修改
- trx_commit_for_mysql:事务提交,释放锁资源。